HYPERDYNE SOFTWARE
How to Clean Porn Off All Your System's Hard Drives In One Pass
Cleaning porn from multiple disks in sequence with Snitch hard drive cleaner software
 Snitch is designed to scan hard drives and help you detect and clean up
any offensive or pornographic material hidden on them. It is easy to set up a scan to analyze just a single folder, but equally simple to select
multiple drives and scan them all at one time. This article will explain how to do this.
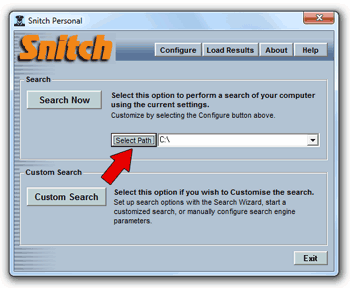
To configure Snitch to sequence up all your computer's hard drives and clean them back to back, we need to tell the software which drives we are interested in and which to ignore. To start with, on the main window, press the select path button as shown in Figure 1. This is where you can configure which folders and hard drives should be scanned.
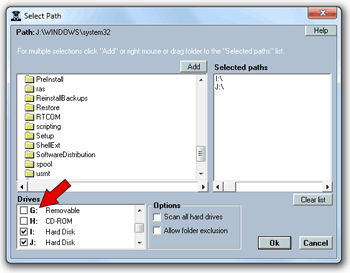
The window is divided up into a few main sections. On the left is a tree showing the folders and drives that exist on your computer. If you only need to scan a few folders and not a whole drive, you can select the folders you want and press the add button to include them in the selected paths box, which is found to the right of the directory tree. You can also drag and drop them from the directory tree window to the selected paths box on the right. Below this are a drives selection box, for adding whole hard drives to scan queue, and several options for speeding up the selection process.
 There are several ways you can go here. Firstly there is a drives box in the bottom left corner
displaying all the drives available on your system. This box allows you to add one or more fixed
hard drives to the list of drives to be scanned and cleaned, simply by putting a check in the checkbox
next to the required drives. You will notice that CD-ROM drives and removable disks also appear
in this list, but for our purposes we will only be choosing the fixed hard drives for cleaning.
See Figure 2.
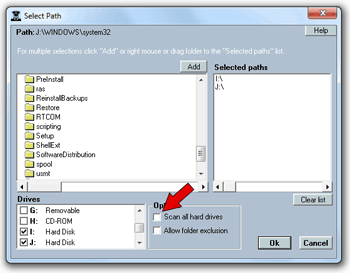
An easy shortcut is to click the 'Scan all hard drives' checkbox as shown in Figure 3. This will automatically add hard drives to the to the Selected Paths list, ignoring any CD-ROM or removable media. You will note that the selected drives will appear in the selected paths box above and to the right.
When you have completed selection of the drives you need to clean up, press the OK button and you will return to the main window. You will now note that the selected paths have been added to the path list.
 One other point to note here is the 'Allow Folder Exclusion' option. This will display an additional box
where you can exclude specific folders that you don't wish to include in the scans.
This is useful for excluding folders such as the root Windows folder which typically only contain system files; and excluding this folder can help increase scan speed and accuracy because the scan engine does not need to spend time unnecessarily analysing system files that are known to be benign.
You are now ready to run a scan. To find out more about setting up for a scan, read How To Set Up Snitch Before Running A Porn Scan. Once you have selected the appropriate drives, press the Search Now button to get the scanning and cleaning process started.
You can read more about the benefits of Snitch here, but as a quick summary:
- Snitch hard drive cleaner can detect hidden porn, pictures and movies on the computer's drives.
- Snitch can detect various types of hidden hard drive files such as renamed files and files inside compressed archives like ZIP and RAR.
- Making your hard drive cleaner will speed up your PC's responsiveness.
- Cleaning porn off your hard disk will also free up space for important files.
As you can see it is easy to set up and run Snitch computer cleaner software by configuring just a few settings. This only has to be done once because these settings are retained; so when you next need to clean your drive, everything is still configured as you left it last time.
Download a free trial of Snitch HERE or Click HERE to buy Snitch


